Showing posts with label Crafty ladies. Show all posts

Thursday, May 2, 2013

Paint

 
Everyone has heard of freezer paper tutorials at this point.  I'm late to the party but what a party.  My twin sisters turned twenty-four and one of them (the teacher) got a rad tote bag.  My bag making method is basically two big rectangles sewn together and then turned inside out and then sewn again (my mum calls these french seams, I assume she's right) and then handles.  Here is my incredibly simple explanation of how to freezer paper stecil with the shakiest iphone photos ever:

 
I printed my design out on regular paper (and the BIGGER and simpler the design the better when you starting) and I taped it onto a cutting board.  Then, with the shiny side down, I taped a layer of freezer paper over it.
 
 
You could trace and then cut but I just used an exacto knife and cut through both the regular paper and the design beneath.  You are aiming to have the negative space intact so I cut tiny bits out of the E rather than worry about keeping the E intact.


Then I placed the E with the shiny side down onto the fabric and ironed it on high without the steam setting.  I paid extra attention to the edges because I wanted the edges of the E to be crisp.  Then I painted my fabric paint on with a foam brush and when I was done I peeled off the freezer paper and left it to dry (no photos of the painting part,  I was unnecessarily concerned and got paint on my fingers like the glamorous mess I am).
 
 
And then I made myself this knitting project bag.  Can I stencil hearts on ALL THE THINGS?


Friday, April 26, 2013

Friday

Paper Flowers, Set of 6, Quince Blossom, Dark Coral

 
My experience with West Elm has been really mixed,  I ordered Christmas presents that were then backordered (after I paid) until March and only after ten calls and a bunch of really unattractive tweets did they acknowledge this and then attempt to make it right (which looked like just sending half the order and canceling the other order).  Then for birthdays I gave it another shot (because my brother REALLY needed this and my sister needed a house warming gift) and they came and they were beautiful (if slow).  So the fact that I have a deep and abiding need for this rug is source of irritation to me.  Despite the mixed bag that is WE, I'm loving their paper flowers and they have inspired me to try making some of my own before I buy some.     These crepe paper pink flowers are my favourites and this crepe paper bouquet is fun, a few of these on my desk might be just the thing.  
 
Crafting, a trip to Eastern Market, some roast chicken and a special project for the twins birthday are all on my weekend agenda.  I hope yours is scrumptious. xoxo

Wednesday, March 27, 2013

Envelope Liners


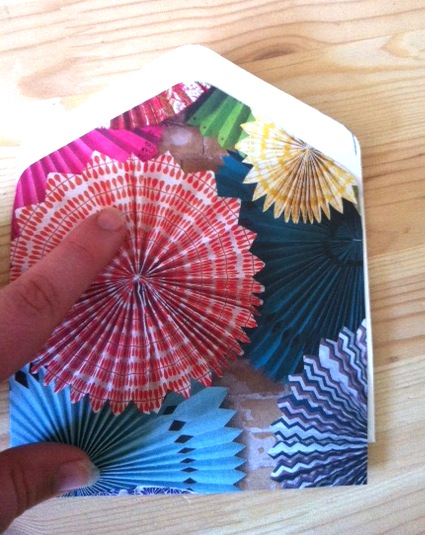
Mary asked how I managed to line the envelopes for my friend Judy's shower invitations so here is the easier DIY ever.    Get an envelope, pretty paper (I used the cover of the Paper Source catalogue), a pencil, scissors and glue stick or glue pen.


Trace your envelope onto the wrong side of the paper.  Cut it out.


Slide the paper down until the top looks like it's about right.  Trim the bottom of the liner off so it will fit inside your envelope.


Put a little glue on the bottom and slide the liner into the envelope.  Glue the flap portion and BOOM!  Done.   Lamest DIY ever, so effing easy. 


Tuesday, December 11, 2012

Darling Deer


After seeing Sweet Paul's deer with glitter antlers I was convinced that these would make me extremely happy and christmasy.  Mine are not as well photographed (or probably as well glittered) but they are pretty rad.  I used silver glitter nail polish instead of paint and glitter since I figured my accuracy might be better that way.  I'm pretty pleased with them.

Wednesday, December 5, 2012

Winter Branches

Sometime over the summer I saw this pin and wanted to do something with paper birds and natural elements this Christmas but I wasn't crazy about all that babies breath and thought it wouldn't last very long.  I thought about glittery birds in a winter branch.  All fall I kept my eyes out for a branch I thought would work and pounced on this one in October (and stored it in our closet and David asked me eighteen times why I had it and when it was going to go away please).  On Saturday David was at school prepping for finals and I was trying to put off going to the grocery store and doing laundry.  I pulled out some of my stationary cards (I didn't have any real cardboard) and Modge Podge and some Martha Stewart glitter  and I was ready to roll.

 I made a cardboard template (on my very messy work surface) of a flying bird and then traced it repeatedly on my card stock.  After cutting out a bunch of birds I brushed them with Modge Podge and covered them with glitter and let them dry.


Mean while I strung this branch by thread from the ceiling using pushpins to hold into the ceiling. 

 Once your wee glittery birds are done you just poke a whole in them with a push pin and hang them from your branch.


And yes.  There are too many photos in this post.  And yes there is a ladder in these photos as I was standing on it to hang the wee birds.  And yes if you make this your father might say "I don't quite get the concept." and "it's a disembodied branch, what's it suppose to be?" but he'll still go see Susan Stamberg read Chanuka stories so it's okay.

Wednesday, November 28, 2012

Mittens


Last year for Christmas I made each of my siblings a pair of mittens for their stockings.  This year my mitten making is limited to actually making myself a pair.  I read a bunch of patterns and ended up finding this typewritten in my grandmother's* knitting stuff.  If you know where it's from let me know and I'll avoid the copyright infringement and take it down.  I figured it might be written by my gran so I'll post it for you since it avoids any weird setting of the thumb.  Happy knitting.

Grandma Mittens**

I used size 4 double sided needles and a ball of worsted weight yarn.

Cuff - Cast on 44 stitches and divide on 3 needles. 
Join, work in round k2 p2 ribbing for 3 inches. 
Decrease 2 stiches in the last round.  There should be 42 stitches.
Hand - K even for 2 rounds.
First increase round: Increase one stitch in the first stitch, k1, inc 1 in the next stitch, k to end of row.
K 2 rounds even.
Second increase round: Inc 1 stitch in the first stitch, k3, inc 1 in the next stitch, k to end of row.
K 2 rounds even.
Continue to increase with two more stitches in between the increases every 3rd row, increase until you have 54 stitches on.
K 2 rounds even.  Slip the 15 thumb stiches to a stitch holder.
Cast on 3 stitches, there should be 42 stitches on now.
Continue to work even until the measurement above cuff is 6 inches.  Decrease 3 stitches in the last row.
First decrease round: k2tog every 3rd and 4th stitch, 10 times
K even 3 rows
Second decrease round: k2tog every 2nd and 3rd stitch, 10 times
K even 3 rows
Third decrease round: k2tog in succession all the way round.  Break off yarn, leaving a tail.  Draw end tightly through all stitches and fasten off.
Thumb – Slip to two needles the 15 stitches from the stitch holder.
With 3rd needle pick up and knit on the 3 cast on stitches.
There should be 18 stitches on  the needles for the thumb.
K around until the thumb  measures 2 inches above the cast on stitches.
First decrease round: *k1, k2tog* repeat 5 times
K even 2 rounds
K2tog in succession.
Finish as for top of mitten.

Make another mitten exactly the same way! 


* Does't she look like Olivia de Havilland? Isn't she gorgeous?
** And yes that blanket is that bright in real life. One of two family tartan blankets we got from the UK contingent as wedding presents.